Funky Pizza Party

By: Mighty Media

Recipe Information

Total Time: 20 minutes

Servings: 3


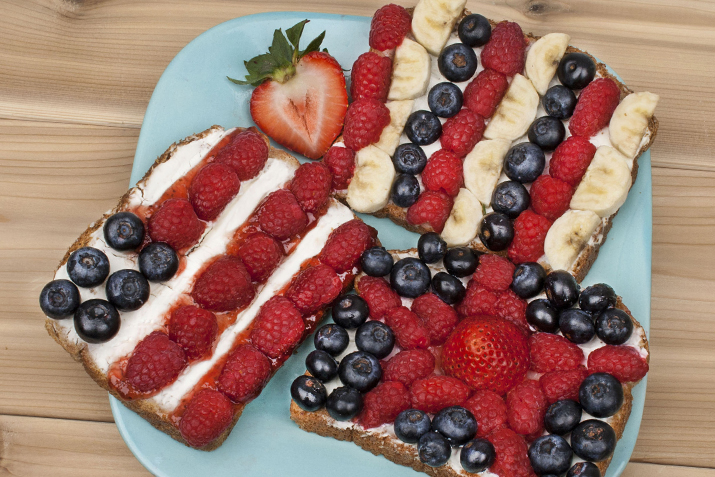
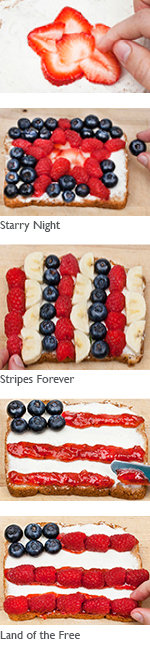
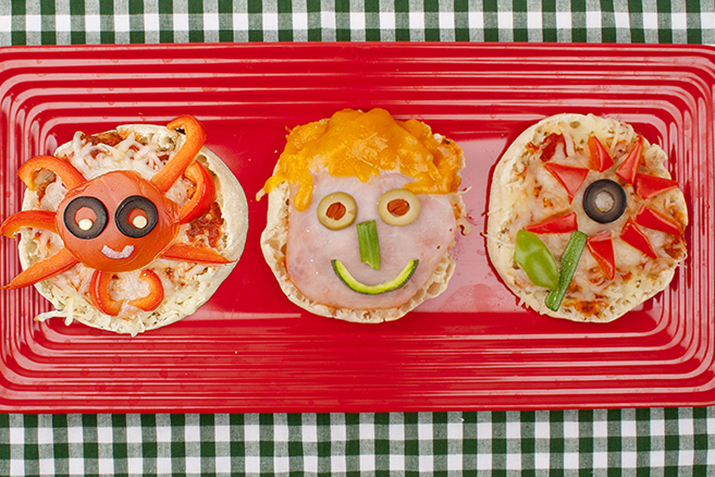
Get the fun going with this charming and healthy pizza-making activity! Makes a great lunch or party snack! For a larger image of the pizzas, click here.


Ingredients

  • 3 whole grain English muffins halves
  • 1/2 cup pizza sauce (optional: make your own pizza sauce; see Tips & Notes below)
  • 1 cup shredded mozzarella
  • 1 tomato
  • 1 red pepper
  • 1 zucchini
  • sliced black olives
  • 1 red onion
  • 1 ham slice
  • 1/4 cup shredded cheddar cheese
  • green olives with pimento
  • 1 green onion
  • 1 green pepper


Preparation

  1. Preheat the oven to 350 degrees F.
  2. Slice the English muffins in half. Cover each muffin half with pizza sauce. Top each one evenly with cheese.
  3. Follow the directions below to decorate the muffins. Put them on a baking sheet. Bake them for about 8 minutes. Take them out and let them cool before serving.

Tomato Crab

Funky Pizza Party preparation
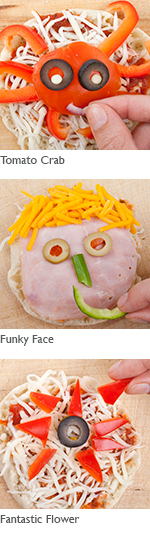
  1. Cut a circular slice from the side of the tomato. Place it in the center of a muffin half.
  2. Cut a few thin slices of red pepper for the legs. Put one end of each leg under the edge of the tomato. Cut two smaller slices of red pepper. Put them next to each other in the front.
  3. Add eyes. Cut a slice of zucchini. Use a drinking straw to stamp two circles from the zucchini. Place the zucchini circles on the tomato. Place two black olive slices around the zucchini circles.
  4. Add a small slice of red onion under the eyes for a mouth.

Funky Face 

  1. Cut a slice of ham into a circle. Place it over the cheese on a muffin half.
  2. Add shredded cheddar cheese on top for hair.
  3. Put two green olive slices below the cheese for eyes. Use a long slice of green onion for the nose. Put it between and slightly below the olives.
  4. Cut a slice of zucchini. Cut the slice in half. Cut off a curve of zucchini skin. Put it under the nose for the mouth.

Fantastic Flower

  1. Put a slice of black olive in the middle of a muffin half.
  2. Cut a few triangles about 1 inch long from the red pepper. Arrange the triangles around the black olive like petals.
  3. Peel a strip of zucchini skin 2 inches long. Cut it into into a thin rectangle. Cut a piece of green pepper into a leaf shape. Put the zucchini strip under the flower for the stem. Put the green pepper leaf next to it.


Nutritional Information

227 calories, 14 g. fat, 45 mg. cholesterol, 616 mg. sodium, 13 g. carbohydrate, 2 g. fiber, 14 g. protein


Source: https://www.grocery.coop/recipes/funky-pizza-party

Stars and Stripes Sandwiches

By: Mighty Media

Recipe Information

Total Time: 20 minutes

Servings: 3

Celebrate the 4th of July with these easy and healthy festive eats!

Ingredients

  • 1 cup strawberries
  • 1 cup raspberries
  • 1 banana
  • 1 cup blueberries
  • Light cream cheese
  • 3 slices of whole wheat bread
  • Berry jam

Making Stars and Stripes sandwiches

Preparation

  1. Thinly slice 1/2 cup strawberries. Cut all the raspberries in half. Slice the entire banana.
  2. Toast three slices of bread. Spread a layer of cream cheese over the top of each toasted slice.

Starry Night

  1. Form a star shape using five strawberry slices. Put the star in the middle of a toasted bread slice.
  2. Outline the strawberry star with cut raspberries.
  3. Fill up the rest of the toasted slice with blueberries.
  4. Cut off the top of a whole strawberry. Place it in the middle of the star.

Stripes Forever

  1. Cut banana slices in half across the middle. Lay the slices in a vertical row on the right-hand side of the second toasted bread slice.
  2. Make a row of cut raspberries next to the banana slices.
  3. Make a row of blueberries next to the raspberries.
  4. Continue making rows of banana slices, raspberries, and blueberries until the toasted slice is filled.

Land of the Free

  1. Make two horizontal lines of three blueberries in the upper left-hand corner of the last toasted bread slice.
  2. Make three horizontal lines of jam on the toast. Use a knife to make the lines even and thin. Make sure a line runs into the blueberries.
  3. Place cut raspberries on top of the lines of jam.

Serving Suggestion

Serve with replacement fruit so that once kids eat the strawberry star, for example, they can replace it with a raspberry star, then a banana star, etc.


Nutritional Information

230 calories, 5 g. fat, 10 mg. cholesterol, 240 mg. sodium, 43 g. carbohydrate, 7 g. fiber, 4 g. protein  

Source: https://www.grocery.coop/recipes/stars-and-stripes-sandwiches

Quick Cooking Legumes

By: Christy Morgan

Christy Morgan gives us a tour of quick-cooking, nutritious legumes and how to use them. Lentils take center stage in Christy’s recipe for a crunchy, zesty lentil salad with radish.

Find more Co+op Kitchen videos featuring information and easy recipes for making delicious meals at home, as well as handy hints from chefs and food enthusiasts who love sharing their passion for great food.

Video Transcript

Hi. My name is Christy Morgan, and I’m known as the Blissful Chef. Today we’re going to talk about legumes, which are vegetables that grow in pods.

They’re so nutritious—full of fiber, full of protein and have no cholesterol. Displayed here in front of me is the before and after cooking of different types of legumes.

Types of quick cooking legumes

Mung beans

Mung beans are often used in Southeast Asian cooking and are sprouted to make mung bean sprouts.

Green lentils

Green lentils are great for stews and also for salads like we’re going to make today.

Red lentils

Here we have red lentils, which are used often in Indian cooking to make daals and soups.

Split peas

Split peas are really great for winter split pea soup.

Legumes are a great way to get protein in your diet because they do not require soaking, and they are quick cooking.

A simple, lentil salad

Now we’re going to make our lentil salad. We’re going to use one cup of lentils.

The first thing you are going to do is sort through them to make sure that there are no stones or debris. Now these are ready to be cooked, but I’ve already pre-cooked some for our salad today.

Now we’re going to chop our vegetables for our lentil salad. We’re going to use about ten cherry tomatoes for this salad, and I like to cut them in half to make them into smaller, bite-sized pieces. I’m going to add these to my lentils.

And then we’re going to do some fresh oregano.

Now we’re going to make our dressing for this salad, which is going to include one tablespoon of tamari, about one tablespoon of Dijon mustard and a dash of maple syrup. We’re also going to add sea salt and black pepper to taste. Whisk this together and add it to the salad. And make sure the lentils and the vegetables are completely coated with the dressing.

This salad looks beautiful and is a great way to get your protein in. Going to add some fresh oregano on top, and then we are finished with our lentil salad.

I’m Christy for Co+op, stronger together.

Source: https://www.grocery.coop/food-lifestyle/cooking/quick-cooking-legumes

Rice

By: Hilah Johnson

Rice is a staple food in many different cultures, and the number of rice varieties available might just surprise you. Hilah Johnson takes us on a world tour of rice, including red, black, and wild, and offers tips on how to cook and use rice.

Find more Co+op Kitchen videos featuring information and easy recipes for making delicious meals at home, as well as handy hints from chefs and food enthusiasts who love sharing their passion for great food.

Video Transcript

Hey guys. I’m Hilah from the online web show Hilah Cooking. Today we’re going talk about all the myriad varieties of rice.

Types of rice

Long-grain white rice

This is probably the one you’re most familiar with. This is a long-grain white rice. Basmati and jasmine are well known examples of long-grain rices. It’s very fluffy looking. And these are the rices that you’d want to use if you were just going to make some rice to go with a curry or do a pilaf or something like that.

Short-grain brown rice

This is a short-grain brown rice. Brown rice has a little bit more minerals, a little bit more fiber than white rice. It’s got a great nutty flavor.

Parboiled rice

Here we’ve got an example of parboiled rice. Parboiled rice is rice that has been boiled in its husk, so it can be more nutritious. It has a longer shelf life. It cooks up fairly quickly.

Short-grain white rice

This here is an example of a short-grain white rice. This is sushi rice. You can see these grains are almost round. Short-grain rice is good for anything where you want sort of a creamy, starchy consistency. The grains stick together as opposed to the long-grain, where they remain more separated.

Wild rice blend

This is a wild rice blend. This particular one has wild rice, brown rice and red rice in it. Wild rice is actually botanically classified as a grass seed, not a grain. So it’s not actually rice, but it cooks up like rice, and it can be used anywhere that rice can be used.

Red rice

Here we have some red rice. And red rice is like the brown rice in that it still has the germ and the bran attached. And it’s just a fun change to liven up your plate a little bit with some more color.

Black rice

Finally, we have some black rice. This is used a lot in Thai cooking for desserts and puddings and things like that, because it does have a natural, nutty sweetness on its own. What’s unusual about it is its color. This purplish/black color actually runs all the way throughout the entire kernel of the rice.

How to cook rice

If you want to make your rice a little bit more fluffy, you can rinse it first. I’ll show you how to do that. It’s super easy. Just got a little sieve here. So you can do that. Pour a little water over it. And then you can kind of swish it around in the water like that. As you can see, the water got real cloudy. That’s from the excess starch that’s on the outside of the grains. Removing that is what’s going to make your rice cook up a little bit fluffier. And then we’re just going into our pot.

Now, most rices, generally the ratio is 1 part rice to 2 parts of water. Long-grain and white rices need like 1 3/4 cups of water to 1 cup of rice. And then your brown rices and short-grain rices, you might want to bump that up a little bit more.

I’m going to go ahead and do about 2 1/4 cups of water with this 1 cup of rice. I’m just going to put it on high heat. Bring this up to a boil. Our water and rice mixture has come to a boil. And I can see that because there’s a little bit of steam coming out.

So now I just want to give it a stir to make sure there’s no big clumps. I’m going to put the lid back on it and turn it down to a simmer. And you’ll just want to make sure that you leave the lid on it because the rice is kind of steaming and boiling at the same time in there, so you want to make sure all that moisture stays inside. Our brown rice is going to take about 40 minutes before it’s fully cooked.

And this is what your rice should like. It’s tender throughout; you don’t have any crunchy centers, and the grains are still intact, meaning they haven’t like exploded and just turned into mush.

I’m Hilah for Co+op, stronger together.

Source: https://www.grocery.coop/food-lifestyle/cooking/rice

Sauteing and Pan Flipping

By: Dana Tomlin

Learn the basics of sauteing and how to practice tossing your food in the air like a pro with Dana Tomlin. Dana demonstrates proper technique while making a delicious goat cheese and bell pepper omelet. Once you’ve got your flip down, change up your omelet with your favorite fillings.

Find more Co+op Kitchen videos featuring information and easy recipes for making delicious meals at home, as well as handy hints from chefs and food enthusiasts who love sharing their passion for great food.

Video Transcript

Hi. I’m Dana Tomlin. I’m the deli manager at Wheatsville Food Co-op in Austin, Texas. Today I’m going to be showing you how to use a saute pan and how to flip in the air.

When you saute, you’re using a dry, high heat, which enables your food to cook really fast, get a good sear, and, with the aid of the saute pan, you’re going to flip it, which causes it to get mixed really well.

Learn how to pan flip

What I want you to do at home is to try this with beans, and I’m going to show you how it mixes with beans and rice.

So this is the motion for flipping. Shake back and forth, and then you pull towards you. Shake and then pull towards you. You can see that the lip of the pan is what causes that food to flip back on you. And you don’t have to shake it hard. You don’t have to pull it back hard. Just real easy. Boom, like that.

Now I’m going to put the rice back here in the back to show you sauteing and the motion of flipping can mix foods. Flip. Shake, shake.

Flip. This is a really easy way for you to get used to flipping before you actually put an egg in it.

How to make and flip an omelet

Now we’re going to make an omelet using this technique. I’m going to show you how to chop your veggies for the beginning of your omelet and how to saute in the pan.

I’ve got a prepped red onion right here. The way that I like to prep my onions for this type of saute is to cut them this way. This gives you nice little slivers, which are really good for omelets.

I like to use red and green bell peppers for this because it’s a nice mix of colors, which looks really nice in an omelet.

And we’re good to go. I’m going to go ahead and get my saute pan nice and hot for sauteing.

I’m going to do butter and olive oil. That way I get the flavor of the butter, but I’m going to mix it with the olive oil so that the milk solids in the butter don’t burn.

So you can tell that it’s ready to go when it looks like this. If it was just olive oil, it would start to shimmer a little. So now it’s nice and hot. I’m going to turn it down to medium, and I’m going to drop my onions and bell peppers in.

Let’s shake it. Then flip it in the air. Then leave it down on the burner for a little bit so that pan gets good and hot.

Dump this in here. Get it out of that hot skillet. All right. There we go. So this is going to be what we use when make our omelet.

Okay, so I’m going to crack three eggs.

So get your oil nice and hot. You want to move it around so that it’s coating the bottom of the pan really well. Once it’s good and hot, I’m going to put my eggs in. And this is the fun part. You can hear that sizzle.

That is perfect. The trick to making an omelet is that you leave the sides of the omelet alone so that they hold form, and then you scramble inside. Sometimes you’ll need to take your spatula and run it along the edge to make sure that the egg has lifted.

This is really good. You can tell it’s a little curled up. That’s how I know it’s ready to go. So shake it a little. Back and forth motion.

There you go. I’m going to take some of the onions and bell peppers and put them just on one side. And some goat cheese.

You’re just going to slide it out. And then as it gets to about half way, you’re going to use that skillet to flip it over. And then there you go!

I’m Dana Tomlin with Wheatsville Food Co-op in Austin, Texas, for Co+op, stronger together.

Source: https://www.grocery.coop/food-lifestyle/cooking/sauteing-and-pan-flipping

Sea Vegetables

By: Christy Morgan

Sea vegetables, also known as seaweed, are among the most nutritious foods available. Learn about some common varieties of seaweed with Christy Morgan. From wakame to dulse, Christy explains the differences in flavor and how to incorporate them into your culinary repertoire (see the related recipe, Orange Wakame Salad).

Find more Co+op Kitchen videos featuring information and easy recipes for making delicious meals at home, as well as handy hints from chefs and food enthusiasts who love sharing their passion for great food.

Video Transcript

Hi. My name is Christy Morgan. I’m known as the Blissful Chef. Today we’re going to talk about seaweed or sea vegetables, which have more trace minerals than any other food. They vary from ocean to ocean.

Types of seaweed

Nori

The most commonly known one is nori, which you’ve seen wrapped in your sushi.

Kombu

Here we have kombu, which is also known as kelp. I use a 1-inch piece of this when I cook beans and when I cook grains to help aid in digestion and add trace minerals.

Dulse

Now we have dulse, which is a beautiful red sea vegetable that’s one of my favorites. It does not require soaking, and it often comes in a condiment shaker at the local co-op.

Arame

Sea vegetables come dried, and some of them need to be reconstituted. Arame is an example of that. It has a stronger flavor than a lot of the other sea vegetables, so it’s great for marinating and sauteing with other vegetables.

Wakame

Here we have wakame. It’s often found in long strips, or sometimes it’s in flakes. You’ve seen it in your miso soup, but today we’re going to make a nice wakame orange salad with it.

You can watch that in another episode.

A little goes a long way. You actually don’t need that much to get the health benefits. Just a tablespoon or two will do.

Be sure to store your dried sea vegetables or seaweeds in a mason jar or an airtight container.

I’m Christy for Co+op, stronger together.

Source: https://www.grocery.coop/food-lifestyle/cooking/sea-vegetables

Sprouts and Sprouting

By: Dana Tomlin

Dana Tomlin makes sprouting simple with an overview of the types of seeds and legumes you can use to grow your own sprouts. She also suggests ways to enjoy these tasty, nutrient-packed power houses.

Find more Co+op Kitchen videos featuring information and easy recipes for making delicious meals at home, as well as handy hints from chefs and food enthusiasts who love sharing their passion for great food.

Video Transcript

Hi. My name is Dana Tomlin, and I am the deli manager at Wheatsville Food Co-op in Austin, Texas.

What I have here are a wide range of seeds that turn into sprouts. I’m going to walk you through the different types of items that you can sprout and what they look like when they’re done.

Types of sprouts

Garbanzo sprouts

So here I have garbanzo seeds, and they turn into garbanzo sprouts. They have little bit of a baby sprout—not very long. They look a lot like an onion.

Sunflower sprouts

Here we have sunflower seeds that turn into these beautiful little plants right here. They’re really tender and really green. Fantastic for adding to salads.

Alfalfa sprouts

This middle one right here are alfalfa seeds. Alfalfa is one of the easiest to sprout. When you sprout alfalfa, it turns into this, which is beautiful and easy to put in salads or sandwiches, anything like that.

Mixed variety sprouts

Right here is a seed mix. It’s got about three to five different types of seeds. Lots of different flavors and textures.

Broccoli sprouts

We have broccoli seed right here, which is really nice because it gives you a little bit of that broccoli bite. This can add a little zest to your food.

Lentil sprouts

And then we have lentil sprouts, which are really fun. If you’re used to seeing lentils like this, which you turn into lentil soup, now it’s sprouts with little baby tails.

Sprouting is really good because it unlocks nutrients in the seeds, and then you can eat little baby plants while they’re in their prime.

I’m Dana Tomlin with Wheatsville Food Co-op in Austin, Texas, for Co+op, stronger together.

Source: https://www.grocery.coop/food-lifestyle/cooking/sprouts

Tempeh

By: Dana Tomlin

Made from fermented soybeans, tempeh can be a tasty addition to meals or snacks. Dana Tomlin introduces us to this convenient meat alternative.

Find more Co+op Kitchen videos featuring information and easy recipes for making delicious meals at home, as well as handy hints from chefs and food enthusiasts who love sharing their passion for great food.

Video Transcript

Hi. I’m Dana Tomlin. I’m the deli manager at Wheatsville Food Co-op in Austin, Texas. I’m here today to demystify tempeh for you.

What is tempeh and what should it look like?

So, tempeh is made from soybeans, so it’s much like tofu in that way. However, it’s very different because it is fermented. When you ferment a product, you break down the enzymes in it, and you make it easier to digest.

I’m going to go ahead and cut this tempeh in half so you can see the whole soybeans in it. You can see here that there is some gray. You see some of this little white fuzz in there. I don’t want you to be scared of that. That is what makes tempeh tempeh, and it’s part of the fermentation process.

Sometimes manufacturers will also use other grains in it, which is a good way to mix up the types of grains that you eat. The item that I have here has flaxseed mixed into it.

So you can see the dark spots. That’s not part of the mold process. That is the actual other grain.

How to use tempeh

Okay, so I’m going to go ahead and show you how to open up a package of tempeh. Usually you have cut through about two levels of plastic for tempeh. Take a heavy knife and you’re just going to cut through the middle of it. Just go straight through that plastic and then you’re going to go this way as well. And what that enables you to do is just pop this directly out of there. Voilà! Just like that.

There are a few different ways that you can use tempeh, because it is so mild. Lots of times people will slice it and then pan fry it.

So when you cut tempeh you want it to be about this thick, so that it’s got a little bit of a bend to it. If it breaks when you do this, it’s too thin, and it won’t hold up to the spatula.

Marinated tempeh is great for stir-fries or pasta salads. Just cube it up and mix it with your veggies or pasta.

So if we were going to marinate this, we’d just drop it in the marinade and leave it there for 20 minutes, remove it, and then fry it.

What makes tempeh special is that it is nearly a complete protein, which is pretty unusual in a plant-based product. So it’s really good for vegetarian and vegan diets. And also, because of its versatility, it’s really good for meat eaters as well.

Another way to use tempeh is to crumble and use it as a substitute for ground meat in sloppy joes, chilis or tacos. In another video, I show you how to make simple and delicious tempeh taco filling. Be sure to check that out. It’s an easy, delicious recipe your whole family will love.

I’m Dana Tomlin for Co+op, stronger together.

Source: https://www.grocery.coop/food-lifestyle/cooking/tempeh

Three Generations of Cooperation

By: Co+op

Putney Food Co-op
Putney, VT

At Putney Food Co-op (founded in 1941) in Putney, VT, chef Kevin Gillespie learns about the co-op’s trailblazing founder, dedication to reflect its community, and an educational outreach program. He also visits local cheese producer Vermont Shepard Farm.

Find all the videos in the series here.

Source: https://www.grocery.coop/voices-from-the-field/three-generations-of-cooperation

Wheat-free Baking

By: Philip Speer

Living life gluten-free can be challenging. Join Philip Speer for a discussion of wheat-free baking options and a demonstration of how to make a simple wheat-free flour mix.

Find more Co+op Kitchen videos featuring information and easy recipes for making delicious meals at home, as well as handy hints from chefs and food enthusiasts who love sharing their passion for great food.

Video Transcript

Hi. My name is Philip Speer. I’m the executive pastry chef of Uchi Restaurants. Today we are going to talk about wheat alternatives in baking and cooking.

Today we brought a bunch of wheat alternatives out—different flours and starches that we can use in all sorts of ways when trying to sub out wheat-based products for cooking and baking.

All sorts of reasons to bake with alternatives to wheat, you know, not only for health reasons—the textures, the flavors, lots of different crumbs and weights, the results that you are going to get in your baking that differ from baking a regular wheat-based flour.

Types of wheat alternatives

Spelt (an ancient wheat that differs from standard wheat)

So we brought some today. This first one is very common recently; it’s spelt. It’s a good wheat substitute made from dinkel wheat and mold wheat. [Note: spelt is a species of ancient wheat and does contain gluten, but some people who are allergic to wheat do not appear to be allergic to spelt.]

Some other alternatives here in front of me:

Rice flour

We have the white rice flour, actually interchangeable with brown rice flour.

Millet flour

The millet flour here is made from the whole millet grain; it has a really good stone-grain taste.

Tapioca starch

Next, we have a tapioca starch. Tapioca starch is made from the cassava root.

Cornmeal

Next, we have cornmeal. It can be used in anything from flour mixtures to make actual yeast breads to making corn muffins or cornbread.

Potato flour

Next, we have some potato flour. Potato Flour is actually made from dehydration of potatoes.

How to make a wheat-free flour mix

So now we are going to put together our wheat-free flour mixture. So, it’s very simple to make your own wheat-free flour mix at home. You don’t really make a swap out for, say, spelt flour and a whole-wheat flour because they have different properties in how they work. You really want to make a mix of different flours.

We are going to start here with the rice flour, and this is white rice flour. It’s a little bit sweeter than your brown rice flour, which we are going to use as well. They are really interchangeable as far as the actual baking properties, or the chemical properties of them are, but this is a little bit healthier. And then this white rice is going to have just a little bit more sweetness.

Next I am going to add tapioca starch. Tapioca starch is going to make for a better crumb in the end result. And when I say crumb when I am talking about a cake, I’m talking about just the texture of the layers of the air pockets in the cake, and this going to create a finer crumb in the cake.

And then we are going to use xanthan gum to replace the gluten, used as a binding agent, which helps the structure of your baked good.

Next, we are going to use milk powder. And this adds a little bit of protein to your mix.

And finally, we are going to use a little bit of cornstarch here. And what the cornstarch is going to do is help absorb a little bit of moisture and keep that moisture into your baked good.

So this is the wheat-alternative flour mix. I’ve made a pretty large batch here. You can actually store this in the freezer and use it for other things. This is more of an all-purpose that is easily switched out for every day cake or cookie recipes.

Once again, I’m Philip Speer with Uchi Restaurants for Co+op, stronger together.

Source: https://www.grocery.coop/food-lifestyle/cooking/wheat-free-baking